Chapter 6
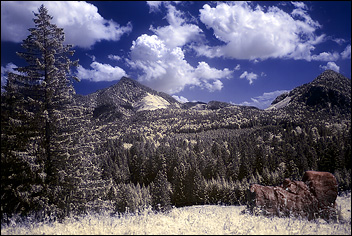
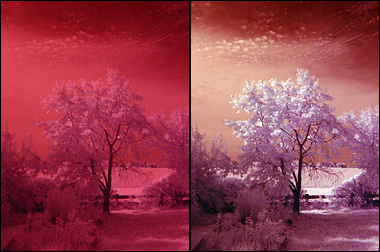
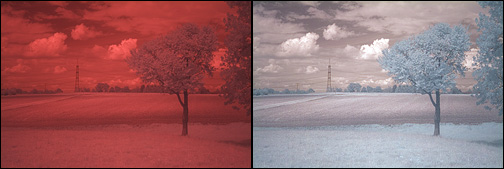
Color-IR - not pure but convincingly real.
A modification of IR-photography
that is attracting more and more fans is the use of colors in the picture. Compared
to the harsh cyan/red pictures of the Kodak EIR film the digital mutation draws
it's major benefit from colors that are still close enough for a viewer to relate
to yet far enough away to work it's magic.
Hold on a sec., just a few chapters back we learned that the view into IR is
monochrome - how the chick does color pop up now?
Partially, say for the biggest part, other filters are responsible for that.
In Color-IR we use "mild" filters that let a good deal of waves from
the visible spectrum pass. This way, at least a duochromatic image is being
recorded.
Mild filters in order of their cut-off frequency:
Heliopan RG645, RG665, B+W 092, RG695, RG715, Kodak Wratten 89b, Hoya R72, Cokin
007, undeveloped Velvia 100 Slide, RG780.

This is by no means a scientific
test, it's just a visual appearance to get a glimpse of how these filters work.
Sorry for the smoke in the RG715, seems that the halogen bulb got a little too
close to the roll of cardboard. ;-)
The three filters in the middle owe their appearance partially to the S2pro
i used taking the pictures, the S2 is so IR-sensitive i had to use a Tiffen
IR-cut filter extra on the lens and still a little gets through.But the point
is well made in this comparison - RG715, being quite close to the ever popular
Hoya R72 really lets a good deal of visible waves in the lower area around red
through.
Color-IR poses some threats to the willing photographer which need to be addressed.
Because now we definitely need all three Color channels we are happy to welcome
enhanced NOISE in our pipeline as a tedious annoyance.
White balance is here of ample importance when shooting jpegs, shooting raw
still makes it really important for the outcome of our colors.
Shooting jpeg
How does a good recorded
picture have to look like? Because you can't pull out a globally valid rule
here in the light of every camera doing it's own thing i can at least give you
some examples:
Out of my very first
experiments with the Fuji S602z:
manual exposure, 1/6sec.,
f2.8, ISO160, White Balance: Daylight
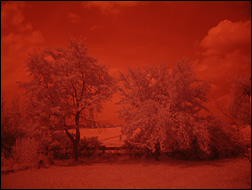
The first rough test to see if and how a picture is suitable for further post
processing is AutoLevel in Photoshop (Shift-CTRL-L, Shift-Apple-L)
If you want to do it without Photoshop and have no AutoLevels you at least have
levels, so pull every channel so far that it is fully filled with data.
Doesn't look too bad. Greetings
to Mr. CenterSpot here, in Color-IR this phenomenon is even more disturbing
than in real IR. Regardless the picture looks quite good and capable of some
nice processing.
Not useable on the other
hand is this shot out of the Sony S75. 1/15sec., f2.0, ISO100, White Balance:
Auto.
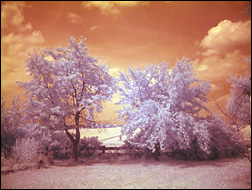
At least no CenterSpot. After ripping out the IR-cut filter the S75 delivers
something like this:
1/500sec., f7.1, ISO100,
White Balance: Tungsten
Much, much better. This look like a winner.
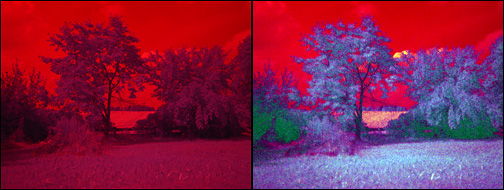
Another example of the modified S75 only with automatic White Balance:
1/125sec., f6.3, ISO100.
This again is hardly useable, there is so little to no differentiation between
colors here - would be a post processing hell.
The last example is again
the modified S75 with White Balance on a red screen. This has become my favorite
WB setting because it kept processing trickery at a minimum. If the block of
glass would have not been turquoise the result here would look quite different
- but after all, it#s just about getting somewhere, isn't it? ;-)
1/250sec., f4.5, ISO100, White Balance: Red Screen
Shooting raw:
If you have a camera with
the ability to save the sensor data in a proprietary raw-format you should definitely
make use of it for the highest possible output. Not only in IR photography ;-)
Most raw-formats save data in a 10bit range of tonal differentiation which is
a nice enhancement of the limited 8bit-space. White Balance is not that important
on shooting - because the look of the picture is set in the raw-converter, along
with the white balance. Later on, when you are a real pro in Color-IR photography
you can influence the amount of data recorded by a nice custom WB, but that's
really for much, much later ;-) For now, we start out with "Auto".
Fuji S2pro, 1/45sec.,
f1.4, ISO200.
 Auto.
Auto.
 (in
raw-conv.)Daylight.
(in
raw-conv.)Daylight.
 (in
raw-conv.) Custom - 2000k.
(in
raw-conv.) Custom - 2000k.
This way you can find a
good temperature/tint setup you like and use it for all your pictures. After
all, Color IR is most of all a form of personal expression and every photographer
will find his/her own style to do it.
Chapter 2 showed the importance of looking at the histogram in all three channels,
color IR is no different in that you need to take care how little or how much
data is being recorded.
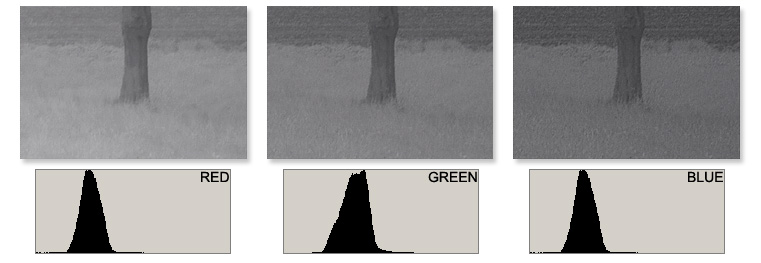
This is a scaled 100% crop
out of the upper S2pro picture balanced to 2000k.
Exposure levels are satisfying, especially in the red and blue channel, blue
channel noise is very acceptable.
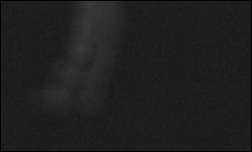
The visual appearance of noise is determined out of amount and form. The blue
channel need our utmost attention here and noise appearance is always the same
within one camera, given the same ISO-setting. So a quick test with any picture
from the camera you'd like to use in IR-photography is easy to do. Take a picture,
look at your blue channel - and judge for yourself if adequate or not. I'll
show some guiding examples again:
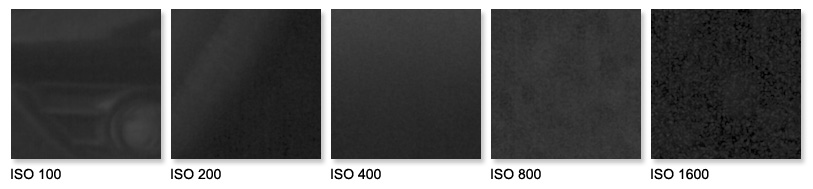
This is the noise appearance
over the ISO-range of the Fuji S2pro. This would look so nice, up to ISO 400
one could really work with that body - too bad that grid-shaped patterns destroy
the evenness of the noise so this body is unusable for IR. (not only for that)
More examples:
 Nikon
D70 at ISO200.
Nikon
D70 at ISO200.
 Canon
EOS 10D at ISO200.
Canon
EOS 10D at ISO200.
 Canon
IxusI at ISO100.
Canon
IxusI at ISO100.
 Fuji
S602z at ISO100.
Fuji
S602z at ISO100.
 Sony
Cybershot S75 at ISO100.
Sony
Cybershot S75 at ISO100.
These examples are intended
to help you judge your own camera. As i have shown from time to time, even with
the hilarious noise level of the S75 it still is possible to get some decent
imagery out of it - useable size well below prints of A4 though :-)
Summary:
The next important thing
in Color IR-photography after getting a mild filter is the White Balance setting
in your camera. You need to find a setting that will produce an image with two
clearly separable colors, then post processing will open all doors to the look
you want. If the noise levels of your camera are within useable parameters you
are ready for your first fully blown pictures - the next chapter shows how to
work one ;-)