Chapter 3
First
experiences
or
Why does it look that bad?
We'll start
with REAL IR here, colored IR gets it's share in two later chapters, bearing
in mind that it's not the real thing that we are going to talk about now.
The filters of choice for real IR are Kodak Wratten 87c, B+W 093, Hoya RM90,
Heliopan RG830 (with very narrow eyes), RG850 and most of all the elusive King
of IR-Filters, the RG1000. If you want to work with SLR bodies and wide angle
lenses with gel-holder, Kodak Wratten offers the 87c in a few sizes and here
in Germany we have at least one shop offering a quite cheap "dark IR gel",
which is very soft though - but nice for reproducing the typical blown out halo-look
of the Kodak HIE. The undeveloped slide is mentioned here and there, too, you
can indeed get some results of interesting pictorial value from it, but as i
can see through it it belongs to the color IR section. Again, with SLRs you
can glue a gel behind the mirror, too, if you take care that no moving parts
get stuck you'll get the benefit of a clear viewer.
The very first pictures often are kind of discouraging - the above was one of
my very first with a Fuji S602z and Heliopan RG830.
Reasons for this mostly are:
- out of focus
- use of automatic white balance
- not the right ambient lighting (e.g. time) or season
Focus
Focusing a
system camera is often very limited. If yours offers a manual mode for focusing
see if you can go for an infinity setting - of course only as long as you are
doing scenery work. If you can't use any manual mode you can still try to focus
through the filter. If that doesn't work either your last resort would be to
remove the filter for focusing, either hold the focus or fix it and put the
filter back on an fire. This would be quite tedious and my advice would be -
get a better suited camera.
If your camera focuses automatically or you have set the focus manually but
the result is still out of focus, try to play with it manually and find out
if there is a shift. Usually this shift can be disregarded because it's not
very big, because we are up and about completely in the NIR, this may become
a problem even though.
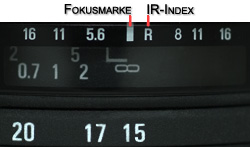
SLR-Lenses
offer a great deal of easy handling here because manual focusing is what a good
lens should do best. Many lenses offer a etched or printed IR-index by which
you have to shift your focus if working completely in the NIR. I have had good
results from using some of my old Nikkors just with the infinity setting right
away - but if your lens has an IR-index, good sense demands you to use it ;-)
White Balance
WB is not so
much as a problem in real IR photography as it will be in color IR. What you
will get is a monochrome picture anyway, so why bother?
Because even though it's only monochrome you will ge a tinted picture most of
the time, purple, magenta, cyan, light blue - depending very much on the make
and model of your camera. Why is that?
A quick dive into some CCD-Basics. The electrons of the waves pass the glass
of our lens, the Hot Mirror (if installed) and the bayer grid on the photo cells
of the CCD element. A bayer grid is a composition of little color filters, for
each photo cell (pixel) one. This is how it looks like:
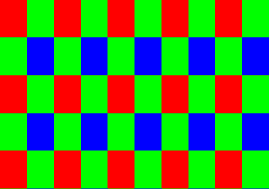
Every CCD incorporating the use of a bayer grid is covered by 50% green, 25%
red and 25% blue color filters, the rows alternating red/green and blue/green.
This is an imitation of the working function of our retina as covered in the
Introduction.
Depending on the material an degree of filtering these filters seem to let infrared
radiation pass in a different way - beyond that the internal software of the
camera is responsible of using an inverse bayer algorithm and rendering a final,
"colored" image. And here is where every manufacturer has his own
recipe. With different cameras but the same filter under the same conditions
you will get completely different contents in the three color channels. I don't
really understand how a color filter, whose job it should be to successfully
block certain wavelengths can at all let these waves pass, but i am sure there
is a good explanation for it.
Fact about it is that we are moving way out of spec for the camera - so everything
we get out here is what we have to deal with ourselves. Even though there is
no one valid recipe for all the cameras, at least some tips:
- If your camera offers a black and white mode use it! (will not help on shooting
raw - the Fuji S2pro lets you choose BW as image mode but will record all color
sensor data anyway)
- If you want to change the basic white balance, do a custom balance on a red
screen.
- If your camera offers histogram re/preview carefully check your channels on
exposure - no channel should clip.
Without histograms and in color you have to slowly work your way towards your
goal by doing serial tests, you need to find a good balance between the noise
levels rising on too much of underexposure versus losing important detail on
overexposing.
Exposure
Let's have a look at some pictures:
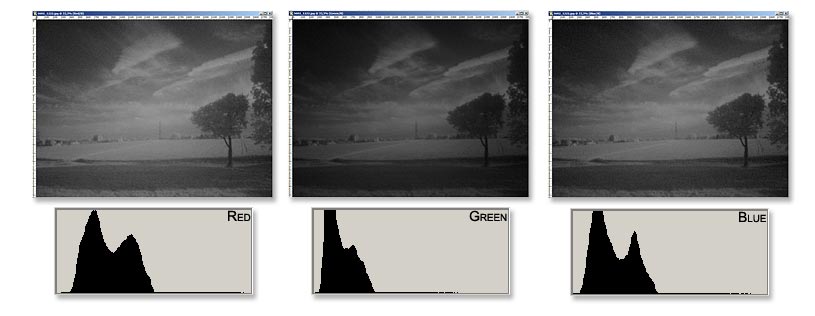
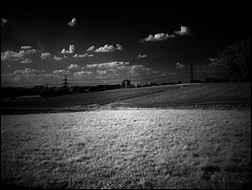
Here we have
the "bad" picture from the start of this chapter, well out of focus,
automatically white balanced, automatic exposure. The histograms show that it
is generally underexposed - if you were to push the data afterwards in post
processing to get a normal exposure noise levels will shoot up like crop in
the spring - so this one goes straight to the bin.
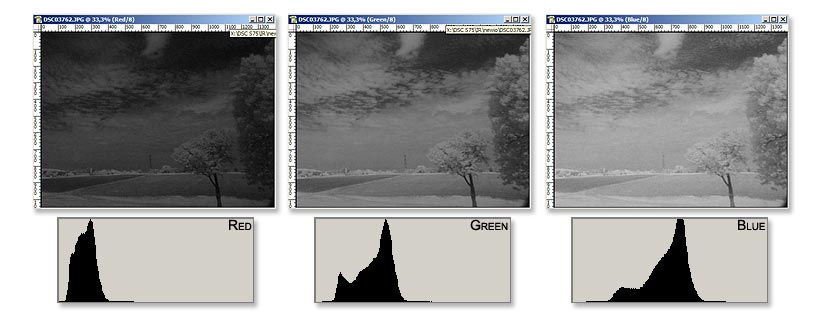
This one was
shot with a Sony Cybershot S75 with RG830 filter.The Sony offers a black and
white mode which is quite good, all the channels of course have the same data
then, so i can only show you one. This doesn't look too bad, the amount of pushing
needed here is not too much so i will not be punished by intolerable noise levels.
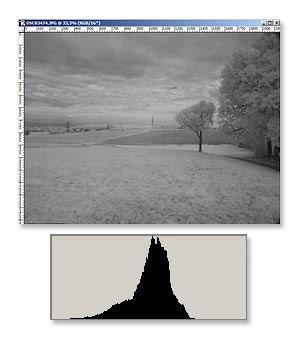
This is the
Sony S75 again with the RG830 filter in color mode with custom white balance.
This is a tight fit - a little more exposure and the blue channel data would
have clipped strongly, a little less and the green and red channel would suffer
from underexposure. An image like this offers be a good deal of breathing space
in post processing.
As you can "read" from the histograms the end result of this would
be a cyan/light blue image. Compared to the purple picture from the top the
amount of data in the green and blue channel is well increased. This is a great
help because the blue channel is under served in any way - and as in all fields
of digital photography the blue channel is the one we need to give a little
more attention. Shifting the distribution of data with a custom white balance
is helping there. Exposure should always be done manually, if you can't use
a histogram but only the display you will learn how the picture on the display
"should" look like so it comes out right in your processing software.
As with this Sony, auto focus is working great through the filter.
CenterSpot
As mentioned,
having a light falloff in the corners is natural for almost every lens. How
exactly the effect of the CenterSpot is being invoked is still a mystery to
me - what is very clear is that a strong spot will ruin your picture beyond
reparability. The spot shown in the picture is not really dramatically. A spot
like this could be processed out of this picture with some matting. Mild spotting
is something one can easily live with, the size and form of it changes with
closing aperture or on different zoom level if you have a zoom lens. If you
had no choice but to use the lens that has a slight spot (e.g. with a system
camera) you could spend an afternoon shooting the blank wall in all different
settings so as to get good pictures of the spot itself. These will then serve
as masking layers in your image processing software. That way you can globally
lighten or darken the exact parts of the picture to get a "clean"
shot.
IR photography is all about trying things - go out and shoot at different times
and with different angles to the light source (a.k.a. sun) - there is bound
to be some setting under some condition with some objects where even on good
mannered lenses a spot will occur - so there`s no need to fret too much, find
out how and when the best setting for you is.
Summary:
When using
a deep filter the distribution of tonal values across the channel is something
for you to keep an eye on. Play with a custom white balance setting to feed
as much data into the three channels as you can. Focusing test will show you
how to set the focus on your lens to get the best results.
Now we are ready for the hunt for motives - what you can find will be the topic
of the next chapter.